Saturday, September 03, 2016

Random Photos of My Experience with Moose Hide Tanning

As I wrote earlier I tanned moose hide this summer. I don't want to document the process other websites can do that for you. I am going to do my usual random pictures of what happened. But I am going to try to keep them in chronological order.

 All the hides I worked on were Curtis's hides and the first two I worked on with him with his guidance. He is the expert I am the apprentice.

We started working on hides in May. As an aside this is when the fires of Fort Mac Murray were going on and this is what the smoked looked like here one morning as I was going to work on the first hide.


Anyway, here are the photos, if you look carefully you can see that there was two hides.


The hide  is stretched and we can start working on it.

Fleshing it


Scraping the hair off.


That one, a third hide, I tried to save but it was quite rotten and full of maggots and turned out to be too thin to scrape properly. Afraid to make more and more holes I didn't scrape it enough and as a result it could not be tanned. To tan it I would have to rescrape it and it is too thin for that.


This is the tanning solution (in the bottle) made of cooked brain, soap and lard.

This is the hide in the very first picture, tanning solution has been applied and since it was sunny it is sitting in the sun for a few days.


The second hide had to be put over a small fire at the same stage because there was no sun. (notice the small tipi is being put to good use and one of the pole is resting on it)


The final smoking: This is actually a good example of what not to do, too much of the smoke is escaping.


The rotten spruce wood used in the process

One of the hides (the second one) once it is tanned and soft but before the final smoking.

and here it is all done.

Friday, September 02, 2016

Dene Nahjo's Hide Tanning Camp in July 2016

in July (July 11th to July 29th) Dene Nahjo had a hide tanning camp in Yellowknife and I decided to go and spend some time with them to learn other ways, news things about hide tanning and meet new people. I only spend a week there but it was great and to me entirely successful. I am not trying to document the process and explain how it is done here but as usual I just want to post some just-about-random pictures.

One of things I had never seen done before was cutting the flesh off the edges with a knife before lacing it to the frame. It allows to unlace the hide later on and so you can relace it on a frame should you have to. I like this a lot and I think that I will try to do this from now on.


Then it was laced on the frame as usual.

Because caribou and moose hides were being tanned I got to see the process for caribou hides, much smaller and thinner hides. They were never stretch on a frame. First the were de-haired wet with a knife.


After this is is scraped wet on both side while being stretched on a pole.

In this picture you can see the woman at the back getting the pole she is going to use ready.

Then the hide is dripped dried. You can see how small and thin a hide it is.

All while the moose hides where stretched on a frame and scraped on both sides (first the flesh side, then the hair side)


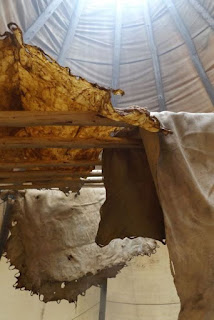
Quite a few hides were done during the camp and in the tipi hides at various stages were being smoked
I am just posting those 2 pictures because I think that the hides all together look so beautiful.

Some of the people brought the work they had done on hides they had tanned before.

Generally it was a great experience. It was great to hang around dynamic young women, people with similar interest and learn new stuff. I am pleased I went, and just a little sorry I only stayed a week.

Seal Skin Mitt Class

Sometime in the summer too I took a seal skin mitten making class. It was awesome. Over a week end we all made a pair of seal skin mitts.
This is all the mitts that were made by the students and instructors.

 The instructor was a woman from Ulukhatok, a small community on the west coast of Victoria Island, she and a friend of hers who was helping brought their ulus and not only showed us how they were used but let us use them. I like the mitts but in a way my favourite part was the chance to use this traditional woman's tool.

The class was offered by the Museum of Northern Life here in Fort Smith.

Using the ulu was my favourite part but the most moving part was when the daughter of the instructor, a grown woman in her mid twenties I would guess, was looking at a picture of Ulukhaktok with obvious longing. She was missing her home so much it hurt to watch. Communities are so far apart in the North, flights are very expensive so people can find themselves far away from home for long periods of time.

The Unfinished Wood Shelter

Once I got into cutting poles, I had a phase I think and just started to think as all kind of projects using poles. And this is how the 6-cord-woodshelter got started. I decided to do a.... you guessed it.... pole structure.

I cut my own poles, dug 3 feet deep holes, tried to line up the poles as much as I could, and raised the 6 poles needed for the structure that way.


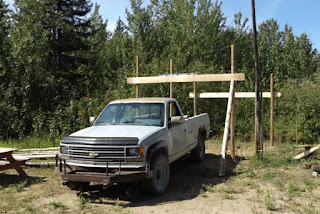
Than it was time to put double girts across and this is when I started using the truck as a ladder. Because I am on my own I had to find a way to hold the 2x8 on one side while I was putting it up on the other side and this is what the  pole which appears to be lining on the structure is doing. It is holding the girt up for me.
First I just put one screw in, then drill a 1/2' hole through the 2 girts and the vertical poles and then bolted them together.

Since later on the rafters will rest on the girts I needed them to line up just right.
I first put the 2 most outward girts then put 2 rafters on top and all other girts were added so they would fit snugly under those rafters which means that in time they will be sharing the load the rafters will be carrying.  No point in putting 6 girts in all if the rafter only rest on two or three.
I had to think in terms of possible snow load here.

...And unfortunately it is pretty much where it is at right now, and has been for the last 5 weeks since I sprained my ankle. I do have all the girts (so 6 and not 3 as in this picture... one on each side of the poles) and they are all bolted in place.

Morels

I did managed to pick a handful of morels


The Tipis or Teepees

 It actually has been a very busy summer. Mostly I have been tanning moose hide, trying to build a wood shelter, garden etc but somewhere in there I build two tipis. The first one is quite small (9 feet tall inside) but just the same I quite like it.


The second one was a bit harder to put together because it is a lot taller (19 feet inside). 
First I put the tripod up.

Then added the rest of the poles

It is hard to show how big it is


But to give you a sense, here are the poles when they are still in the truck (yes I cut the poles myself, I did the entire thing myself alone)

The poles for the small tipi

The poles for the bigger tipi